Musings of a Designer on Jewelry, Crochet, Crochet Patterns, Knitting, Running a Crafty Business, Movie Costumes, Books, Art, Design, Steampunk & the Geek Girl Life
Showing posts with label tutorial. Show all posts

Wednesday, March 23, 2011

Annotated Tips for Knitting the Noro Scarf - Part III

Hurrah! I've just finished my Noro Scarf!! It is gorgeous and I can't wait to wear it out and about tomorrow. Here's some pics of the finished scarf and my last notes on what I've learned:


Annotated Tips for Knitting the Noro Scarf

The tails
- So many, many ends to weave in from cutting out knots and the too thick/thin bits in addition to beginning/ending skeins. Wasn’t sure how to do this since there is no “back side” to hide the tails on. Found this great video on weaving in the ends on ribbing and that’s how I handled all the tails: http://www.youtube.com/watch?v=nzMQ4tpFQoA

Final thoughts
- My scarf ended up approx. 5 3/4" by 66". I am an extremely slow knitter and I do throw my yarn (entailing taking my hand off the needle completely to work a knit or purl) so this scarf took me an eternity. I clocked 82 hours from start to finish. This does include time spent researching how to do certain relevant knitty things and those first two endless weeks where I frogged and restarted the whole thing so many times I thought I'd wear out the yarn. But ...I have to say this project was excellent, through shear repetition, at teaching knits and purls and how to identify and fix any mistake involving basic knitting. I now feel very confident at knitting and am ready to try something more advanced. I am so very proud of knitting my Noro scarf!! Job well done, self :)

Annotated Tips for Knitting the Noro Scarf

I've been chronicling my adventure in learning to knit with the Noro scarf on my blog. Want to make a Noro scarf or making one at this very moment? Follow my journey and read all my annotated (and I hope helpful) posts:

A Crochet Learns to Knit: Adventures with the Noro Scarf - Part I

Annotated Tips for Knitting the Noro Scarf - Part II

Annotated Tips for Knitting the Noro Scarf - Part III

Sunday, March 06, 2011

How to Do Basic Beaded Crochet Lace

With beaded lace patterns I'm often asked, "How do you get the beads on there?" or "How do you do beaded crochet?" or "How do you bring up a bead (abbreviated in crochet patterns as 'BUB') to crochet it?". Here's an illustrated tutorial on how you do it (Note: Beaded lace is tiny - Click on any photo to ENLARGE IT):

1)Pre-string all beads needed for the pattern on your yarn/crochet thread. I use a big eye collapsible needle (available in beading stores) to string my beads. Not all beads in a batch may fit over the needle and onto the yarn - discard those that don't slide easily on.
Illustrated Tutorial How to Do Basic Beaded Crochet Lace

2)Let's start with adding a bead to a chain stitch. Hold the majority of the beads behind your left hand away from your working area. Slide up a bead to work with.
Illustrated Tutorial How to Do Basic Beaded Crochet Lace

3)Push the bead up snug to the prior stitch. You have now brought up the bead and it is in place to work the stitch called for in the pattern, which in this example is a chain stitch.
Illustrated Tutorial How to Do Basic Beaded Crochet Lace

4)With your hook, reach over the bead to grab the yarn and KEEPING THE BEAD UP SNUG TO THE PRIOR STITCH .....
Illustrated Tutorial How to Do Basic Beaded Crochet Lace

5)...complete your chain stitch. You will notice that the bead will always appear on the BACK side of your work, not the front.
Illustrated Tutorial How to Do Basic Beaded Crochet Lace

6)Let's continue by learning to add a bead to a double crochet stitch. Again, keeping the rest of the beads off to the left out of the working area, bring up a bead and push the bead up snug to the prior stitch.
Illustrated Tutorial How to Do Basic Beaded Crochet Lace

7)With your hook, reach over the bead to grab the yarn and KEEPING THE BEAD UP SNUG TO THE PRIOR STITCH .....
Illustrated Tutorial How to Do Basic Beaded Crochet Lace

8)... insert your hook from front to back and .....
Illustrated Tutorial How to Do Basic Beaded Crochet Lace

9)... draw up a loop. Look at the photo closely. You want the bead to be on the back side of the crochet hook. (Note: clicking on the photo will enlarge it)
Illustrated Tutorial How to Do Basic Beaded Crochet Lace

10) This is an example of what you do NOT want. Look at the photo closely. The bead is in front of the crochet hook. You want it to be at the back, or on the top leaning back, but NOT in front.
Illustrated Tutorial How to Do Basic Beaded Crochet Lace

11) With the bead at the back, complete the double crochet stitch as normal. You will notice that the bead is again appearing on the BACK side of your work, not the front. Once you've made a few more double crochet stitches ....
Illustrated Tutorial How to Do Basic Beaded Crochet Lace

11)... flip your work over to see all the beads perfectly incorporated into your project.
Illustrated Tutorial How to Do Basic Beaded Crochet Lace

Friday, February 25, 2011

How to Make A Magic Ring / Adjustable Ring / Magic Circle Loop in Crochet

One of the questions I get asked most about my patterns is, "How do I make a magic ring?". A magic ring, also known as an adjustable ring or magic circle loop, is a starting technique for crocheting in the round. Instead of "chaining 2 and then putting ___ # of stitches into the second chain from the hook", you create a loop to put the stitches in that can be drawn up tight to leave no, or a barely visible, hole in the center. It is used often in amigurumi patterns and other Japanese crochet patterns. Here's how you do it:

1) Leaving a long tail hanging off to the left, wind the yarn from the yarn ball around your fingers as shown.
How to Make A Magic Loop Magic Circle Adjustable Ring in Crochet

2) Grasp the yarn at the top with your forefinger and thumb where the strands overlap. The tail is still the yarn hanging off to the left hand side.
How to Make A Magic Loop Magic Circle Adjustable Ring in Crochet

3) With your hook, reach through the ring from front to back and grab the yarn that leads to the yarn ball.
How to Make A Magic Loop Magic Circle Adjustable Ring in Crochet

4) Pull up a loop and ....
How to Make A Magic Loop Magic Circle Adjustable Ring in Crochet

5) ... chain 1. Think of this chain 1 as a "locking stitch". It is NOT part of your stitch count. It is part of the magic ring.
How to Make A Magic Loop Magic Circle Adjustable Ring in Crochet

6) With your hook, reach through the ring again to pull up another loop to make your first single crochet. Continue making as many single crochets as is called for in the pattern. Here I did 8.
How to Make A Magic Loop Magic Circle Adjustable Ring in Crochet

7) When you've finished making stitches into the ring, grab the tail and pull gently on it to close the ring.
How to Make A Magic Loop Magic Circle Adjustable Ring in Crochet

8) Slip stitch into your first beginning single crochet, NOT the chain 1 "locking stitch". Pull the tail of the yarn again to make the ring tightly closed. Note: Some patterns may have you skip the slip stitch and start your second round by stitching directly into the first stitch of the first round -- either way is valid.
How to Make A Magic Loop Magic Circle Adjustable Ring in Crochet

8) Your'e done!!
How to Make A Magic Loop Magic Circle Adjustable Ring in Crochet

Sunday, February 13, 2011

Annotated Tips for Knitting the Noro Scarf - Part II

About 1/4 done with my Noro Scarf adventure. Here's what I've learned so far:
The instructions - Had to look up how to do slip stitch edging. There is a video out there on this scarf. It has slightly different instructions than in the original pattern. Don’t follow the video. Just slip the first and last stitch purlwise on the second row of each color. (slipping purlwise = put your right-hand needle through the stitch as if to purl, slip it off the left needle onto the right needle and continue with the pattern). Turns out very nicely.

The slip stitch edging - Worth learning to do for the very nice finished side edges. What I learned the hard way: when you reach the end of the second row of a color and are slipping the last stitch purlwise, make sure your yarn is pulled to the front so it’s in the right position to pick it up again in the next color shift!

The tension - With all the color changing and yarn flipping etc, especially at the beginning, you will be tempted to pull the yarn up tight at each color change. Don’t!! Relax on those edge stitches so they are not at all tense or tight or you will get a curve in your scarf edge. I pulled the yarn up completely, but didn’t cinch it tight. Some of those loose edge loops seemed huge but they usually stretched out tight as I continued.

The yarn - Beautiful color shifts and it’s addicting to watch the changing color stripes…what cool color combo comes next? However, it varies quite a bit in thickness and thinness. Had to cut out a few sections where it was so thick it created big puffy sections in the knitting. Also .. the knots! Has knot in it that never seemed to occur on an edge so had to cut out those and rejoin yarn for those too. Also .. don't be afraid to cut out certain undesirable colors or re-roll a skein entirely in the opposite direction to avoid the effect in the third photo. Both skeins had a light grey/green color at the same time. The colors are different, but similar enough that the stripe effect is lost for a bit.
Here's the scarf on my Ravelry Page: Noro Striped Scarf

Monday, June 15, 2009

How to Make a Sticky Post on Blogger

This is a useful trick to know: how to make a "sticky post" that always stays at the top of your posts in Blogger. Here's how:

1) Sign into Blogger and click the "Layout" tab at the top.

2) Select "Add a Gadget" and then choose "Text".

3) Complete the "Configure Text" window, click the "Save" button.

4) Drag the text item to the "Blog Posts" section of your layout.

5) Click "Preview" to make sure the sticky post appears at the top, then click "Save".

6) You are done!

Saturday, December 13, 2008

How to Be Your Own Model Tutorial

Ideally to model your wearable items you'd find someone else to be your model. Or have a camera with a self-timer mode. But what if you don't have the luxury of either of those? I use the old "pose in the mirror and photograph your reflection" trick.1) Stand in front of mirror making sure ugly background things are not visible.
2) Assume a pose.
3) Hold camera away from your body and point it at the mirror. You will *NOT* be able to see through the viewfinder, so just guess.
4) Hold the camera as still as possible.
5) Click. Reposition. Click again. Take a bunch of photos.
6) Review pics. There will always be a few nice shots! Even though it might not seem like it at first, careful cropping will give you quite a few to choose from. Although the larger the item you are modeling, the more likely part of the camera will show.

Here's me using the technique to photograph myself in a lacy caplet. I made 2 of these for Christmas gifts and thought they were so cute, I made myself one too :) It gives a bit of warmth while still letting me have full mobility of my arms. Perfect for late night winter crafting in my cold studio!

You can see a bit of the camera in the second shot, but these are just for me so I'm OK with that. I think the top photo turned out pretty well!

Now... off to finish wrapping and get my caplets in the post!

Wednesday, August 20, 2008

Hand Tinting an Engraving -- Further Explorations

Well, I am so glad you all liked the tutorial on hand tinting an engraving! What an overwhelming response! Thank you to everyone who left such lovely comments and to those who emailed me for more info!

I was so inspired by all your positive feedback that I'd thought I'd play around with the idea some more. Here is another pic from the Graphic Fairy -- which is fast becoming a daily addiction to check :) Pretty yellowed paper, but gorgeous mermaid! Love the tail on her and that wistful pose.
OK... so here is it cleaned up and tinted. You can see the tips for doing this on the prior post, "Hand Tinting an Engraving -- Marie Antoinette in Color". I used a lot of colored chalk on this one for a softer look. Chalk works really well to introduce texture when you have large blank areas of paper to cover. She also has that trademark rouge I give all my engraved women.


Next, I thought it would be fun to scan this back into the computer and see what it would look like converted back into a black and white image. This is what it would have looked like had it been printed in a newspaper and then left to age 20 years. Now it's vintage :) For those who don't know, I adore hand tinting and since I don't have a color printer (just this 20 year old cranky doorstop that reluctantly spits out black ink invoices) I probably spend more time than most perfecting hand tinting since if I want it in color, I have to colorize it :) I do have access to a scanner though, so just had to try this.

Oh, it is just lovely!!! Really rich depth of tone. Tail could have some deeper shadows, but all in all quite worthy of being an illustration to a children's story.
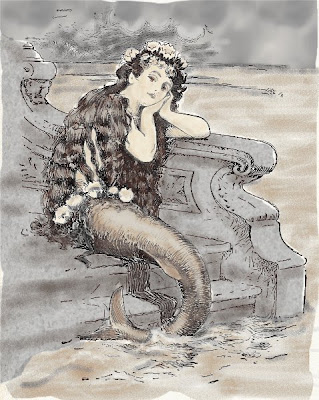

Well, that looked pretty cool, but what if a used some of those fancy filters that come with your computer's graphic program. You know, the ones that are fun to play with but you never really use? This is what it would look like in thick, creamy oil pastels. Oo la la!!! That is just amazingly beautiful! Barely looks anything like the original. Scroll up to the top yellow original holding this image in your mind to see how much the image has evolved.

Well, thank you so much everybody for being my inspiration to continue playing with this!

Now, I have a question for you. This further exploration has turned out so well, do you think I should maybe try to make some notecards or postcards from these images? Do you think there would be any interest?

And if I did, since I don't really do any printing, how would you turn an image like this into a postcard? The only thing I can think of is printing the image out at a copyshop and then appliquéing it onto the front of a blank card so it would be an artcard, but lots of artists make postcards so there must be a better way out there. I would love any advice on this.

In other news, school starts for my two little ones in just a week, so I can now declare my blog break officially over :) Soon they will be off to school with their little backpacks and lunch boxes. My youngest is off to kindergarten this year and it will be strange not to have him at home, but this is going to be such an exciting year for him! My eldest loves school and can't wait to show his little brother the ropes. What good brothers they are!

Tuesday, July 29, 2008

Hand Tinting an Engraving -- Marie Antoinette in Color

I love to hand tint and digitally color old illustrations and engravings. Especially fashion plate images. I recently was introduced to an absolutely fabulous blog of free vintage and Victorian clip art called The Graphics Fairy. This one of Marie Antoinette in a fancy dress full of bows and with ostrich plumes in her hair practically begged me to colorize it. Let's go through the steps to hand tint a black and white engraved illustration.1) Decide on your image. This is how the original Marie Antoinette image looked. Make a copy of the original image to work on. Every time you make a significant change, make a fresh copy to continue working on. You will thank yourself later if you have an artistic mistake and just need to go back one step vs. starting over from the beginning.

2) Clean it up. Remove the yellowing, fix creases, scuffs and rips, and correct discoloring.

3) Do your underpainting layer. Decide on the colors and figure out what belongs to what visually. For historical costumes, consult references if necessary to figure out what parts of the garment are related.

4) Break out the brushes and add highlights and shadows. Overpaint as many layers as necessary to get the depth of color you would like. I always prefer to finish the figure and treat the background minimally, even leaving a few bits barely tinted. I love the contrast between the bright clothing and the more subtle surroundings. I also usually give my women a touch of rouge or other make-up. This is fun to apply and helps the face, which usually has fewer engraving lines, to stand out.

And voila! You have a lovely colorized fashion plate image! This one took me about 2 hours and now is ready to be color copied and used for bookplates, journal covers, cards ..... the possibilities are endless!

I'm technically still on a bloggie break, but sometimes you just need to post :)

Monday, March 17, 2008

Easy Felt Ribbon Rose Pin Tutorial

Hi everyone! It's time for my first tutorial! I only had six spots on my camera card, so it's a five step tutorial plus one beauty shot. Here's what your gorgeous felt ribbon rose pin will look like when it's done. Perfect for Spring!:
Step 1: Gather your supplies. A long strip of felt in the color you want your rose, a pin backing, and one or two leaves cut out of green felt. Also, a needle, and thread colored to match the felt.
Step 2: Fold the felt in half lengthwise and starting at one end, stitch a running stitch along the entire bottom edge.

Step 3: Pull the thread tight until the the felt curls into itself and makes a rose.

Step 4: Tack the rose layers together at the back and then, holding the leaves and pin in the exact spot you want them, stitch the leaves and pin to the rose.

Step 5: Finish with a jeweled center stitched or glued to the center. I used a pearl center (my favorite type of center), but try crystals, gemstones, a felt ball or anything else you can think of. And voila! You have a beautiful rose pin!
Easy Felt Ribbon Rose Pin tutorial copyright Jeweled Elegance LLC

If you make one of these, please let me know, I'd love to see yours! Now... I'm off to Michaels to buy more felt. I'm hoping to have 20 of these in different colors finished for the start of Saturday Market, but with the weather so nice now, it's hard to stay inside and work :) I wasn't planning on selling these online, but if anyone wants a few, just let me know!

**Update: I've entered my tutorial in the Easter Parade & Giveaway at Quill Cottage. Go visit and have fun looking through all the beautiful Easter/Spring links!

Have a great week & a Happy Easter!

Monday, January 21, 2008

My First Treasury!

I logged into my etsy account on Saturday to discover the most wonderful surprise - a lovely fellow etsian, mosaicart, had featured a pair of my earrings in her beautiful Treasury! This is the first Treasury I have ever been featured in and I was just thrilled! I took a snapshot - Can you see me?I'm the one at the bottom left :) I haven't been able to snag a Treasury yet myself. Not that I haven't spent a lot of time waiting, sitting and watching that countdown! Hopefully, with a little luck, someday soon :)

For anybody who wants to know how to get a full screen snapshot of a Treasury, this is how to do it (these instructions are for a PC):
1) Press F11 to get the image the same size as the screen
2) Press PrntScrn (Printscreen)
3) Go to your photo or image editing software and click paste.
4) You're done!

I also received the "You Make My Day Award" from Monica! Monica has a lovely blog and is a talented artist with a great eye for style. Thank you Monica! I pass this award onto these bloggers whose posts never fail to make me smile: Faerie*Dust*Dreams, Fluffy Flowers, Kandeland, and my new bloggy friend DecadentDiamond.