Showing posts with label crochet. Show all posts
Showing posts with label crochet. Show all posts
Monday, October 03, 2011
Cheery Flowers & Purple Lace
I have been super sick with a nasty lung infection these past 6 weeks. It started as the flu and went deep into my lung. So .... there hasn't been a whole lot of creative crafting here lately. I can now drive about town without coughing up a lung (lol) and on my first grocery trip went out to buy some cheery flowers for the house. I love having fresh flowers around the house!
I also was on the mend enough to squeak in one quick project, this lilac lace bowl.
This is stiffened to hold its shape with hot liquid sugar. I worry about bugs and heat using the sugar, although I haven't had any problems to date. Maybe I'll try starch or some plasticizing art compound next time, if I make another. I shaped this one over the back of my mixing bowl, but you can really shape the lace over anything and make all kinds of intriguing shapes. Just remember to line your object with clingwrap first if it can't be washed later - the sugar is very sticky and dribbles all over!
Still sick and coughing, but much improved and hopefully getting better and better every day now!
Sunday, July 31, 2011
Summer Lace Shawl: Finished!
Hurrah! My first lace-weight shawl is finished! Looking forward to summer nights sitting on the porch, ice tea with lemon slice in hand, wearing this gorgeous shawl instead of working on it :)
Wish I had a more glamorous backdrop than my garage door to photograph it against, but you work with what you have. I had a deadline to get a picture of this posted for an online class and this was the only place with bright enough, indirect light at photography time.
I do admit to not being thrilled with this while working on it, but its nature changed completely upon severe blocking and it morphed into quite a beautiful shawl. Very instructive project on the nature of lace weight yarn in garments.
Going out for a celebratory lunch today to mark the successful completion of this big project. There are more than 1300 yds of spider-silk thin yarn in this!!! I will, of course, be wearing my new shawl to lunch.
Here's the link to a prior post on this shawl if you're interested in making one of your own.
Tuesday, July 05, 2011
Could Be a Great Crochet Book!
Look at what I just saw over at Amazon for pre-order! Austentatious Crochet: 32 Contemporary Designs from the World of Jane Austen. Looks like it has the potential to be a very yummy crochet book!
Friday, July 01, 2011
First Lace-Weight Shawl
I'v been busy on the crochet front working my first lace-weight yarn shawl. This stuff is like working with a thick spiderweb! Very delicate. I'm doing the Midsummer Twilight Shawl from Interweave Crochet.
This is the first time I have used Knit Picks yarn, a popular mail-order yarn company. It's not great for ordering a ball or two, because of the shipping costs, but if you meet the minimum for free shipping, it's a good deal. I also ordered my first pair of 16" circular knitting needles from them in that beautiful Harmony Wood product line. I've also heard good things about Jimmy Beans Wool as an on-line supplier, although I haven't tried them yet.
I'm about 60% of the way done with the shawl. To be honest, it doesn't really look like much right now, but I've heard that the magic of lace-weight is in the blocking where the yarn relaxes and opens up and the shawl changes completely. I've finished all the main shawl repeats and am ready to start the wide edging section. I can't wait to block it and see the magic happen!
Tuesday, June 21, 2011
Happy Teacher Washcloths & Soap
My little munchkins discovered my old soap making supplies and decided they wanted to make handcrafted soap for their end-of-year teacher thank you gifts. So the kitchen transformed into Soap Central and we had a glorious day making soap together!
They had been Mommy's soap helpers when they were much younger. Now that they were older, they were able to do almost all the steps themselves from designing and mixing, to choosing additives, pouring and unmolding. They came up with the most awesome soaps! They made:
1) chocolate expresso soap (with real chocolate!!)
2) pink plumeria flower soap
3) ginger-lime nebula soap
4) rise and shine calendula flower soap
5) green tea relaxing soap
6) french lavender soap
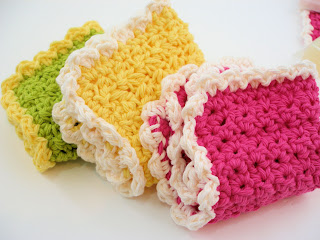
They worked so hard making soap, I decided to crochet some custom 100% cotton washcloths to go with them. I did two for each teacher, some with crab stitch edging and some with a more delicate, feminine, ruffled edging.
I love this shot of the washcloths. It's so hard to make washcloths look interesting in photos, but I love how they look here. Like colorful cakes with white frosting.
This yarn was multi-colored and the patterns the colors made as work progressed were very interesting! Like abstract works of art.
Mom helped wrap everything up and off the gift bags went to school. My boys were very proud of their creations and thought that making soap for their beloved teachers was a most special gift! I hope their teachers enjoy these gifts made with love!
Monday, May 30, 2011
Steampunk Necklace: New Crochet Pattern
I've been working all Spring on this little design and it's finally ready!! I love the design ethos of Steampunk, so I designed a steamy choker with a stylized flower petal motif. I did mine in a deep antique chocolate color, a steamy influenced choice. Hmm.. "antique chocolate".. I like that phrase! Might use it as a future pattern name :) I've also been told it looks like shells and waves, which would make it look fantastic in opalescent whites, or sparkling blues and greens.
It uses ribbon tiebacks so it will fit any size neck, and is my first fully illustrated pattern with MANY annotated photos. An adventurous beginner could certainly complete this quickly.
You can buy the pattern at my Etsy store, or as an instant download at my Ravelry shop. You do NOT need a Ravelry account to just buy from Ravelry, only to access the rest of the site. The design has been fully 3rd party tested (like all my designs) and is available for $3.50. My chokers are $4.00, but due to the current popularity of Steampunk, I'm going to be offering this at the special introductory price of $3.50 until Aug. 1st. Then it will be the regular price of $4.00... so get it soon for the discount! You don't need to make it right away, you'll just have the pattern on hand (at the discounted price) for any time you want to make it in the future.
P.S. If you like this design, please feel free to blog, pin, facebook, tweet etc. with the images and/or info above. I'm a new designer and could really use some help getting the word out about my designs!
Monday, May 16, 2011
Pearl Cotton vs Crochet Thread Sizing
When designing crochet jewelry, I am partial to thin yarn/thread because the finer the thread, the more delicate the finished piece of jewelry. I used crochet thread for years, but one day tried embroidery thread (also called embroidery floss) and was instantly hooked.
If you live in the US, embroidery thread is found in craft stores in the sewing/embroidery section. It comes in a mind-boggling array of beautiful colors. Often time the store will have row upon row of this stuff. And .. it is extremely inexpensive.
For those who may be confused on embroidery thread vs. crochet thread for knitting or crochet, the important thing to remember is that crochet thread and embroidery thread run on different sizing systems. Both are mostly 100% cotton. Here are the nearest equivalents:
* #5 pearl/perle cotton is a little thicker than #10 crochet thread, but is suitable for most #10 cotton patterns.
* #8 pearl/perle cotton is about the same as #20 crochet thread.
* #12 pearl/perle cotton is about the same as #40 crochet thread.
Wednesday, April 06, 2011
New Crochet Pattern: Empire Beaded Lace Earrings
They are finally done! My Downton Abbey inspired earrings!! These are so delicate and lacey. I love them!
The earrings are beaded crochet done with thin crochet thread. I'm advertising them as intermediate skill level, not because they are difficult but because working with small beads, a tiny hook, and skinny thread can be a bit fiddly if you are a beginner. It's better to start with a nice fat yarn and hook if you are just learning crochet.
I published an illustrated tutorial on "How to do Basic Beaded Lace" not too long ago with these very earrings already on the drawing board. So .. if you'd like to give beaded lace a try check out the tutorial :)
My favorite finished pairs were some with translucent peach beads and the other with 18K gold-plated beads (very luxe!!). Here's me trying to photograph white earrings against my pale skin. Hmmm... didn't work very well. No contrast.
Next shot .. trying to get some contrast with the white earrings against my darker hair. Better! I always like to include a shot of earrings being worn by a human being so you can get a sense of scale and how they hang.
As with all my designs, they are rigorously tested before I release them for sale. I am only human though. If you find something confusing or need help, please let me know. I can't help you if I don't know something is wrong!
Friday, March 18, 2011
New Crochet Pattern: Fire Flower Lace Earrings
I love to have fresh flowers around the house. Here is a gorgeous artistic photo of a brilliant bouquet of flowers I received from someone very thoughtful.
A big, beautiful bouquet of flowers bursting with color and scent. It inspired me to design these lacy floral crochet earrings. Think huge, gorgeous blooms like dahlias, peonies, and chrysanthemums. This pattern is really easy and definitely suitable for beginning crocheters.
Feeling creative? You can also use the pattern as a starting point and sew on little beads or pearls. Or, you can glue vintage metalwork, cabochons or cameos onto the center part to make it more steampunkish. You can find the pattern at my Etsy Store.
As always, if you don't want to purchase through Etsy, I can send you a Paypal invoice via email to pay from if you prefer. I've also started to make some of my patterns available as instant Ravelry downloads. There are 3 up there right now to see how it goes. If it goes well, I'll add the others :)
I have another earring pattern in the works, a *stunning* Victorian beaded lace design, plus a steampunk choker with a really unique backward petal design both available by May. And then ... I will be leaving crochet jewelry for a bit to enter the exciting world of crochet garment design! Should be an exciting year!
Sunday, March 06, 2011
How to Do Basic Beaded Crochet Lace
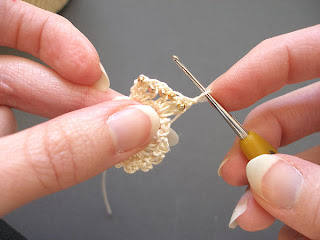
With beaded lace patterns I'm often asked, "How do you get the beads on there?" or "How do you do beaded crochet?" or "How do you bring up a bead (abbreviated in crochet patterns as 'BUB') to crochet it?". Here's an illustrated tutorial on how you do it (Note: Beaded lace is tiny - Click on any photo to ENLARGE IT):
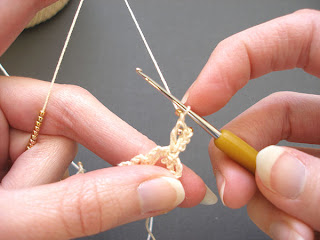
1)Pre-string all beads needed for the pattern on your yarn/crochet thread. I use a big eye collapsible needle (available in beading stores) to string my beads. Not all beads in a batch may fit over the needle and onto the yarn - discard those that don't slide easily on.
2)Let's start with adding a bead to a chain stitch. Hold the majority of the beads behind your left hand away from your working area. Slide up a bead to work with.
3)Push the bead up snug to the prior stitch. You have now brought up the bead and it is in place to work the stitch called for in the pattern, which in this example is a chain stitch.
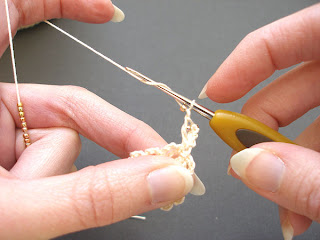
4)With your hook, reach over the bead to grab the yarn and KEEPING THE BEAD UP SNUG TO THE PRIOR STITCH .....
5)...complete your chain stitch. You will notice that the bead will always appear on the BACK side of your work, not the front.
6)Let's continue by learning to add a bead to a double crochet stitch. Again, keeping the rest of the beads off to the left out of the working area, bring up a bead and push the bead up snug to the prior stitch.
7)With your hook, reach over the bead to grab the yarn and KEEPING THE BEAD UP SNUG TO THE PRIOR STITCH .....
8)... insert your hook from front to back and .....
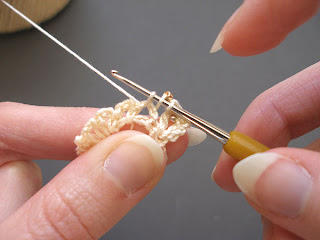
9)... draw up a loop. Look at the photo closely. You want the bead to be on the back side of the crochet hook. (Note: clicking on the photo will enlarge it)
10) This is an example of what you do NOT want. Look at the photo closely. The bead is in front of the crochet hook. You want it to be at the back, or on the top leaning back, but NOT in front.
11) With the bead at the back, complete the double crochet stitch as normal. You will notice that the bead is again appearing on the BACK side of your work, not the front. Once you've made a few more double crochet stitches ....
11)... flip your work over to see all the beads perfectly incorporated into your project.
Friday, February 25, 2011
How to Make A Magic Ring / Adjustable Ring / Magic Circle Loop in Crochet
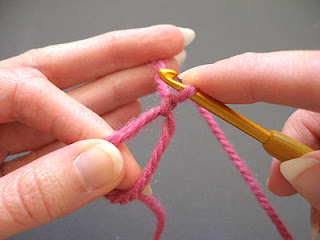
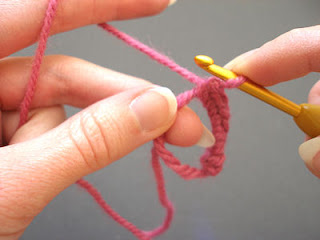
One of the questions I get asked most about my patterns is, "How do I make a magic ring?". A magic ring, also known as an adjustable ring or magic circle loop, is a starting technique for crocheting in the round. Instead of "chaining 2 and then putting ___ # of stitches into the second chain from the hook", you create a loop to put the stitches in that can be drawn up tight to leave no, or a barely visible, hole in the center. It is used often in amigurumi patterns and other Japanese crochet patterns. Here's how you do it:
1) Leaving a long tail hanging off to the left, wind the yarn from the yarn ball around your fingers as shown.
2) Grasp the yarn at the top with your forefinger and thumb where the strands overlap. The tail is still the yarn hanging off to the left hand side.
3) With your hook, reach through the ring from front to back and grab the yarn that leads to the yarn ball.
4) Pull up a loop and ....
5) ... chain 1. Think of this chain 1 as a "locking stitch". It is NOT part of your stitch count. It is part of the magic ring.
6) With your hook, reach through the ring again to pull up another loop to make your first single crochet. Continue making as many single crochets as is called for in the pattern. Here I did 8.
7) When you've finished making stitches into the ring, grab the tail and pull gently on it to close the ring.
8) Slip stitch into your first beginning single crochet, NOT the chain 1 "locking stitch". Pull the tail of the yarn again to make the ring tightly closed. Note: Some patterns may have you skip the slip stitch and start your second round by stitching directly into the first stitch of the first round -- either way is valid.
8) Your'e done!!
Thursday, February 17, 2011
Castle Inspired Striped Scarf Crochet Pattern
I love the scarves worn by Nathan Fillion as Richard Castle on the television show “Castle”. In opposition to the usual classic grey/black/white scarves for men, Castle’s scarves often have bold geometric color combinations while still being extremely masculine.
I made this Castle inspired striped scarf for my wonderful DH as a special gift.
Here's me modeling the scarf. Sorry I'm not a great model ... and I forgot to put make-up on that day!!! ... but you get the idea :)
I've had quite a few people enquire about it so I decided to post the pattern here. It's one I made up just for my DH :) and it hasn't been formally tested, but if you'd like to play around with the pattern and make your own Castle inspired scarf, please enjoy. I wrote this from memory, so if anyone finds a huge error, please let me know!
2 skein bulky (5) yarn in Burgundy
1 skein bully (5) yarn in Navy
1 skein bulky (5) yarn in Dark Plum
I used Cascade Yarns Baby Alpaca Chunky which is *fabulously* soft and luxurious on the skin and very, very warm. It is a bit pricey though, so feel free to substitute another bulky yarn.
Hook size: K
Pattern -
ch 23
Row 1: With burgundy, hdc in third chain from hook and then hdc in each chain all the way across.
Row 2: Turn, ch 2 (counts as first hdc), hdc in back loop only of next stitch, *hdc in front loop only of next stitch, hdc in back loop only of next stitch*, repeat from * to * all the way across, making sure to put the last stitch in the top of the ch 2 turning chain.
Row 3-16: Repeat row 2.
Row 17: Change to dark plum yarn; with dark plum, ch 2 (counts as first hdc), hdc in next stitch, hdc in each stitch all the way across.
Row 18-22: Repeat row 2.
Row 23: Change to dark blue yarn; with dark blue, ch 2 (counts as first hdc), hdc in next stitch, hdc in each stitch all the way across.
Row 24-28: Repeat row 2.
Row 29: Change to burgundy; with burgundy, ch 2 (counts as first hdc), hdc in next stitch, hdc in each stitch all the way across.
Row 30-44: Repeat row 2.
Repeat rows 17-44 until the scarf is as long as you want. My scarf had 4 repeats.
Fasten off and weave in the many ends.
Sunday, November 21, 2010
Mini Crocheted Holiday Stockings
 I'm always looking for cute ways to use all those little bits of yarn yardage you're left with after finishing projects. You know, 4 feet of that gorgeous green alpaca, 6 ft of that yummy white mohair.... bits too small to use in any substantial project but too big to throw away.
 I use many of these remnants to make my flower pins, but what I really found myself wanting this year was a way to use them to make holiday gifts. So I was thrilled to find this delightful pattern on Ravelry: My Stocking Ornament. I'm going to make lots of little mini-stockings and use them as the "wrappers" for little candies to make quick holiday gifts. The stocking can become an ornament after all the candy is eaten.
 The pattern makes the cutest little mini-stockings! It's a really easy, quick, adaptable pattern and will work with any type of yarn. And they are terribly addicting to make .. you can't make just one! I'm leaving mine plain, but these would be super cute with felt holiday shapes appliqued on them or initials embroidered on.
Sunday, October 31, 2010
Autumn Fire
The deciduous trees here have been putting on the most GORGEOUS show. Such vivid red, orange and yellow leaves. Just love this row's fiery autumn foliage. Every year they turn this amazing hot orange color. Just beautiful!
I'm not sure of the species, but one row of trees I pass by walking my little guys to school creates distinct yellow, red, and light orange leaves .... all from the same tree!
The golden yellow ones were my inspiration to make this lacey, yet warm, autumn scarf. Here's my Ravelry project page: Golden Leaves Scarf. I ADORE this scarf pattern. It's one of my favorites. It's called the Queen Ann Lace pattern. You can see two more gorgeous examples of scarves I made using this pattern here.
Yes, that's me in the photo. I'm not terribly keen on being my own model since I feel I photograph poorly, but my son is a blossoming photographer and he loves helping me take pictures of my crocheted goodies. I guess when I'm 80 years old I'll look back on these and think, "Hey .. those weren't half bad!" :)

I'm not sure of the species, but one row of trees I pass by walking my little guys to school creates distinct yellow, red, and light orange leaves .... all from the same tree!

The golden yellow ones were my inspiration to make this lacey, yet warm, autumn scarf. Here's my Ravelry project page: Golden Leaves Scarf. I ADORE this scarf pattern. It's one of my favorites. It's called the Queen Ann Lace pattern. You can see two more gorgeous examples of scarves I made using this pattern here.

Yes, that's me in the photo. I'm not terribly keen on being my own model since I feel I photograph poorly, but my son is a blossoming photographer and he loves helping me take pictures of my crocheted goodies. I guess when I'm 80 years old I'll look back on these and think, "Hey .. those weren't half bad!" :)
Subscribe to:
Posts (Atom)


